Accurate Bite Records and Mounting Models Made Easy
By John Carson on December 13, 2022 | commentsWant to make taking accurate bite records and mounting cases easy and predictable? In this article, you will get simple tips for taking the stress out of taking great bite records, getting the most out of them, and mounting your cases.
Let's start with bites. As we know, there are three basic types of bites essential to restorative dentistry—let's review those and how we will refer to them in this article.
- Maximum Intercuspation (MIP) or Centric Occlusion (CO), which is your patient's habitual bite, or how they bite when they simply close and bite all (or as many as possible) of their teeth together. One important thing to remember is that with most patients when they are in this position, their joints are not seated.
- Centric relation (CR) bites or fully seated condylar position. The hallmarks of this position are happy joints and muscles. In a patient with happy joints and muscles, this position is typically repeatable and an excellent position to treat when restoring a lot of teeth. The catch with this position is that with many patients, there are only a few teeth that touch, and the patient unknowingly shifts from this position to MIP or CO.

- Protrusive. This is taken to record how your patient moved forward and allows you to set the condylar guidance on your articulator.
In this article, we will cover both centric relation bites and protrusive bites, as they are the two most essential, and yet often overlooked, bites—particularly when it comes to treating larger restorative cases. As an aside, I also encourage you to evaluate your patients' muscles, joints, and centric relation to maximum intercuspation slide if you wish to minimize unpleasant surprises for you and your patients. For more on the “why” behind this, check out this Digest article.
Tips for Achieving Accurate Bite Records
Next, let's cover a few universal considerations that are necessary for accurate bite records:
- They need to have some thickness to them, which means in nearly every case, you need to have some space between the teeth. This is especially true and important if you are using polyvinyl siloxane (PVS), as we will see. While it is true that you need to have some thickness to your bite records, I will say that if you absolutely need the patient to bite fully together, then a wax bite record might be your best bet. Wax bite records, however, require special handling to remain accurate, which is why PVS bite records are preferred in almost every case.
- If we are using PVS bite material we need to trim them for them to be accurate. Yes, it is weird, but the material is too accurate to be accurate for our purposes. (I know that sounds a little crazy, but it is true—more on that in a bit.)
- While it is not specific to the bite record itself, we must have accurate, properly groomed models to use any bite record accurately.
So, when it comes to taking a CR record, how do we make that easy and predictable? Well, for starters, as we have already covered, we need to have happy joints and muscles to give us the best shot at getting an accurate CR bite; if the patient has sore or “hot” muscles and/or joints, the chances of getting a good CR bite are slim. In these cases, getting your patients' joints and muscles happy is step one—and in my practice, that typically means I am going to fabricate an anterior deprogrammer or splint to make those muscles and joints happy. For more on picking the right appliance for your case, you can check out this video course or this Spear digest article.
If, on the other hand, your patient has happy joints and muscles, your chances of getting an accurate CR bite are high, and you can proceed to take your bite. There are three basic ways to take a CR bite, and they are: using a leaf gauge, using a Lucia Jig, and bimanual guidance.
While I was initially trained to use bimanual guidance in nearly every case, I find using a leaf gauge or Lucia Jig just as accurate, much simpler, and more confidence-inspiring. For these reasons, I will focus on those two methods here.
When it comes to the leaf gauge method, step one is to select several leaves that will keep all the teeth posterior to the leaf gauge separated enough to ensure there is no contact on those teeth and ensuring there is enough space to provide an adequate thickness for trimming of the bite record.

Too little space and your bite record will be too thin to remain accurate; too thick and you run the higher risk of distalizing the mandible. Additionally, we know that the closer the vertical dimension of our bite record in relation to our desired treatment position, the more accurate it is (within the limits of being too thin). Once the proper number of leaves has been determined, taking the bite record is as simple as drying the maxillary teeth, as you see here.

This is important as it helps the bite registration material stick to the teeth and not slide off with the saliva. Next, dispense the bite registration material onto the maxillary teeth and have the patient close onto the leaf gauge and move their lower jaw forward and then back and hold that position as the bite registration material sets. Have the patient practice this several times before actually taking the bite.

When it comes to taking a CR bite with a Lucia Jig, the procedure is much the same with a few obvious differences. First, your vertical position will not be as adjustable. Secondly, you should make sure your patient is contacting the Lucia Jig evenly. Then, mark the patient's protrusive in red and mark their most posterior position in another color as you see in black here. This is the spot you want to verify they hinge into; then you take the bite.

After that, taking the record is as simple as drying the upper teeth, dispensing your bite material onto the teeth (just as with the leaf gauge method) and having the patient hinge closed onto the most posterior position you marked.
Trimming the Bites
Once you have your CR bite record, the next thing you need to do is trim it. My preferred method is with an acrylic bur like you see here.


You should start with something like this:

And end with something like this:
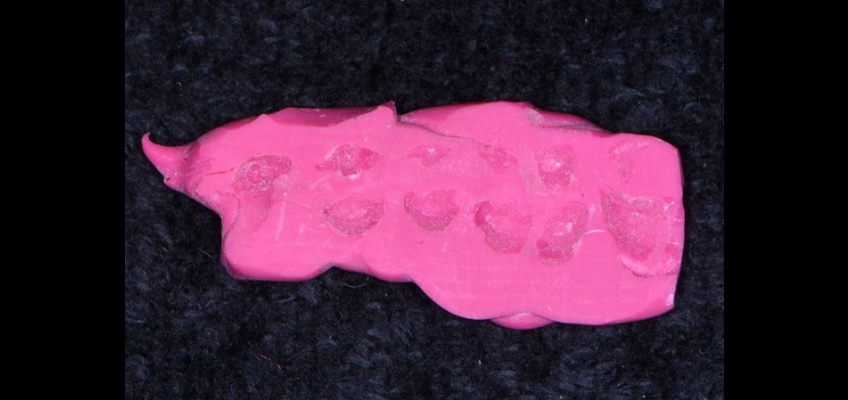
The key is to eliminate all the grooves and leave just the cusp tips and your primary anatomy. You know you are done when your models fit into the bite record with no bounce—they should simply just sit stably in the bite record.
Mounting Tips and Techniques
Once your bite record has been trimmed, the next step is to stabilize the lower model for mounting to your already mounted upper model. My favorite way to do this is with a stabilizing jig like you see here, which you can get from Great Lakes (yours may look a little different but function the same way, as this is an early version).

The key with this is to center it in your model to assure it holds the model stably while centered in your bite record and not tipping it. It is also important that your model base be flat so this can be achieved—it is particularly important that it NOT be slanted posteriorly because if it is you will not be able to pull the metal tongue out. It is also helpful to place some wax over the portion of the jig that will have stone over it to aid in removing the jig once the stone has set.

Once you pull the jig out, the next step is to verify that your mounting's first point of contact is the same as you recorded in your actual patient. If you have taken multiple bite records and you want to see if they are the same, first remove the magnet from the maxillary mounting point.
Then place your upper model into the bite record you want to compare and hold the maxillary model steady in the trimmed bite record on the mounted mandibular model while you close the maxillary element of the articulator into the maxillary models mounting plate.
Once your mounting has been verified as correct, the next step is to fill in the stone for a more secure/durable mounting
Protrusive Bites
These are super simple. Dry the patient's teeth and have the patient close into an end-on-end position or just slightly protrusive to that. The key here is you do not want the patient to be so protrusive that you cannot use the record to set your condylar guidance. You need them forward, but not more forward than your articulator can reproduce. Something like this should work well.

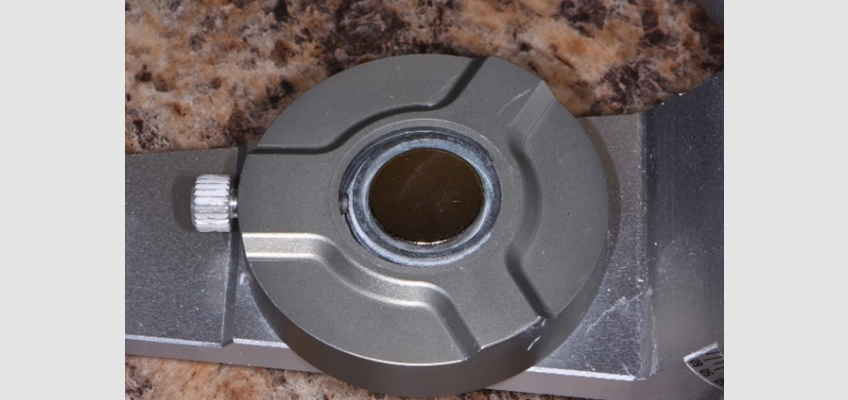
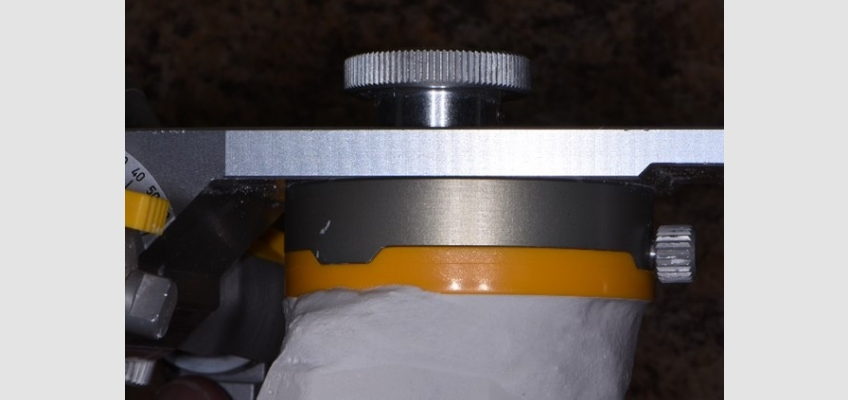
From there you simply take your mounted models on your articulator, unlock the articulator, and loosen the condylar settings, place the models into the bite record and then adjust the condylar settings until they just make contact while the upper and lower models are fully seated in the bite record. With the SAM 3 pictured here, I do this with the articulator inverted so the maxillary portion is resting on the lab bench. Start with no contact as you see here.

And then rotate the fossa until it just contacts the ball as you see here.

Be careful to ensure the contact does not shift the models. I do this with the articulator inverted, so the maxillary portion is resting on the lab bench.
There you have it: simple tips for accurate bite records and making mounting more predictable and stress-free.
John R. Carson, D.D.S., is a member of Spear Visiting Faculty and a contributor to Spear Digest.