The Job Isn't Done Until the Images are Taken
By Gary DeWood on November 7, 2012 | 3 comments

This patient is sporting a full set of original provisionals that I fabricated directly using copyplast formers. These photos will help Winter Lab give me what I need so my patient gets what he wants. He would like me to improve his smile and correct the cant. The first photo (Image 1, above left) shows eyes, occlusal plane and stripes on the wall behind him. The stripes are level with the floor, with horizon and with the benchtop.
This yellow line in the second photo is also parallel with the floor, with horizon and with the benchtop (Image 2, above right). It can be used in conjunction with the stripes to correct the image and let the technician know how the provisionals relate to the final result we are after. Are they exactly what we want or are there necessary changes?
You'll note that once corrected (Image 3, below left), the next photo shows more cant than how I captured it. That's not surprising since even the most seasoned (read that as old) clinicians want to level things when shooting pictures – that's why we have the stripes. Now when Winter Lab mounts my casts they are going to be puzzled because the provisional model is going to have a cant just like you see in Image 3 relative to the benchtop. They will wonder how I screwed up the mounting until they look at another picture, (Image 4, below right).

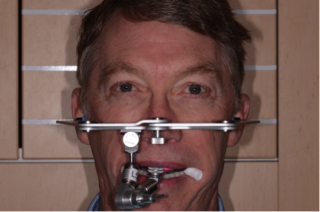
In this image they will see that the cant is indeed real because the facebow is level with the stripes, the floor, horizon and the benchtop – then they will probably call me, unless they've already read my lab slip.
Remember, sometimes following the mouth is more important than following the eyes. This patient's slight cant actually fits in well with his smile as it is, I just want to level it a bit further if the preparations/tooth positions permit. The technician will wax the case to full contour and send me images so I can see how much more of the cant can be leveled and we'll agree on a final design.
Comments
November 7th, 2012
November 7th, 2012
November 8th, 2012