6 Steps For Creating an Ovate Pontic
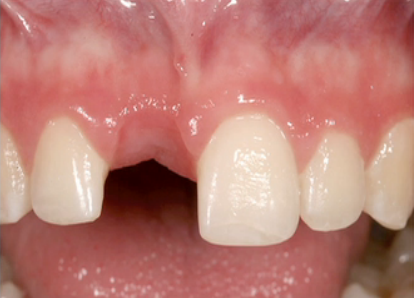
The treatment planning of a teen patient who has lost an anterior tooth can present restorative dentists with the dilemma of immediate esthetics against the need to wait for definitive therapy. This scenario is prevalent — most practitioners have or will treat this type of patient.

Since people continue to grow well into their late teens and even early twenties, they may not be candidates for an implant. For teens who don’t want to opt for a flipper to disguise their missing tooth, the area can be treated with a fixed bridge. The goal of an ovate pontic treatment is to create a natural appearance, and the following steps will guide you to an ideal result.
Step 1: Create Lingual
After making your model, take a colored pencil and draw a curved line over the absent tooth that mimics the lingual over the adjacent tooth. Now take a round-end acrylic bur, carve the model down to that line, and extend it about 1.0 mm deeper.
Step 2: Prep Pontic Site
Once the pontic is made and the site is anesthetized, make an incision in the bone between the buccal and ridge. The more lingual you go, the more volume of tissue you’ll get in terms of plumping. However, the more lingual you go, the harder it is to put the pontic into place.
Step 3: Create Pouch
After making your blunt incision, use the back of the curette to peel the periosteum away from the bone. The pouch must be released enough for the pontic to be placed and have tissue fall correctly around it.
Step 4: Place Pontic
The challenge of a single pontic is positioning it correctly. It’s common for a pontic to tip on you and not align correctly with the other teeth. A copyplast stent will help align the pontic with the rest of the patient’s teeth.
Step 5: Move Tissue and Stabilize
After placing the pontic, use an interproximal carver to carefully place tissue around it. As the tissue continues to fall around the facial area, the pontic will fit right into place. Now insert that same copyplast stent to stabilize teeth and leave it on for 10 to 15 minutes to allow it to set.
Step 6: Bond Pontic Into Place
After particle abrading the wings and interproximal, remove the pontic and etch the adjacent teeth. To prevent bleeding, slightly infiltrate the ridge with an anesthetic and a vasoconstrictor to enhance hemostasis. Paint on the adhesive, place the pontic, and activate the bonding process with a curing light to set.
SPEAR STUDY CLUB
Join a Club and Unite with
Like-Minded Peers
In virtual meetings or in-person, Study Club encourages collaboration on exclusive, real-world cases supported by curriculum from the industry leader in dental CE. Find the club closest to you today!

By: Mark Fleming
Date: December 31, 2018
Featured Digest articles
Insights and advice from Spear Faculty and industry experts


