The Implant Working Cast: 4 Steps for Fabricating a Stone Cast
By Darin Dichter on March 2, 2016 | commentsAs discussed previously in “The Implant Working Cast: Part 1,” there are many reasons clinicians may choose to fabricate and utilize a provisional implant restoration. Rationale for implant provisionalization includes:
- Maximizing esthetics
- Refining functional design
- Interim restoration as an aid in sequencing or phasing a case
- Evaluating status of osseointegration, especially with a “questionable” implant

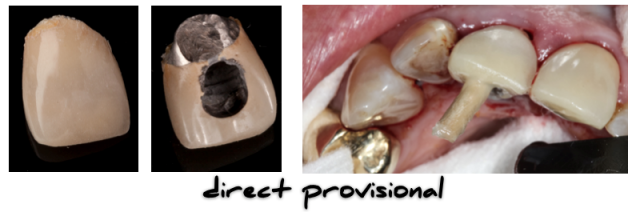
In the case above, I chose to use a provisional restoration to prosthetically sculpt the peri-implant gingival tissues. I wanted to create a more optimal connection between the desired supragingival restorative contours and the implant’s prosthetic connection. In other words, I wanted to create a customized emergence profile. Typically we think about this approach for anterior implant restorations, yet the significant size discrepancy between the mesial-distal width of the edentulous space and healing abutment caused me take this additional step.
Several techniques for fabricating provisional implant restorations exist. Generally speaking, implant provisionals may be fabricated either directly or indirectly.

When using an indirect method, it is necessary to fabricate a working cast. In Part One, I described the steps involved with fabricating a soft-tissue cast. Here I will describe the steps required for fabricating a stone working cast.
Inevitably, both clinicians and technicians will tend to gravitate toward a preferred method of cast fabrication. Nevertheless, it is always beneficial to know more than one way to complete a project.
Option 2: Stone Working Cast
Step 1 – Impression
Make a fixture-level impression. In this example, I am using an open-tray technique, but a closed-tray approach would work just as well.

Step 2 – Connect Implant Components
Chairside or in the laboratory, connect the open tray impression post with an appropriate analog. Verify the components are seated.

Step 3 – The Wax Block-Out
In the soft-tissue model fabrication, a silicone gingival mask was added. In this alternative technique, wax is added to prevent stone from flowing around the prosthetic connection and to begin to create the desired emergence contour.
My materials preference for this technique is the same grey Yeti wax that I use for diagnostic waxing. This wax is hard and easy to carve. And I always have a tin of it nearby.
The Yeti wax is easily contoured and smoothed using a carver, prior to pouring the cast. Using a softer wax, like rope (impression tray) wax, tends to create a messier working cast and is unstable for carving.

Step 4 – Pour and Trim the Stone
The final step in the cast fabrication process is pouring and trimming the stone. Vacuum mixed die stone is vibrated into the impression and allowed to set.
(Click this link to learn more about dental impression problems and how to avoid them.)
When the stone has set, separate the impression from the stone cast. Remember that if an open tray impression was made, the impression post will need to be unscrewed prior to separation. Occasionally I will soften the wax around the connection by soaking the impression in warm water prior to separating the cast. Softening the wax makes cast separation a little easier


Note the wax that is still present around the head of the implant. Later I will be able to continue carving the wax – and ultimately carving the stone cast – to create the subgingival contour necessary for this case.
Comparing the Fabrication Techniques
So which technique is better? Option 1: The Soft-Tissue Cast or Option 2: The Stone Cast? How would you choose? It really comes down to operator preference and what the casts are going to be used for. In my hands, I find the stone cast technique easier to use and control the subgingival contour since I’m not fighting with the gingival mask. Others feel (strongly) exactly the opposite.
If you haven’t yet developed a preference, or maybe haven’t tried using both types of casts, I suggest spending some time with each option and see if one works better for you than the other. In this case, I am actually using both types of casts!
Are We There Yet?
In both examples presented, I created working casts with the intention of mounting the casts to an articulator and fabricating indirect implant provisional restorations on the articulated casts. In this case, I had the luxury of working in the lab, without the pressure of the patient waiting for me. As a result, I wasn’t overly concerned about the time involved with cast fabrication. Each cast took about an hour to fabricate.
There are times, though, in which I may need to work more quickly. There are a couple of ways to do that. One strategy is to shorten the cast fabrication time by decreasing the setting time of the stone. Mixing warm water with the die stone is one option. Another option is to use a stone slurry-water to mix the die stone. Both of these options allow me to use the same die stone as the examples, but get the working cast a little quicker.
An alternative strategy to shorten the working cast setting time is to alter the stone selection. Rather than a selecting a conventional die stone, with the customary 30- to 40-minute set time, a rapid setting Type IV stone could be used.
Snap-Stone (Whip Mix) is an example of a fast-setting Type IV stone. This stone is ready for use after just five minutes. While that is great for many procedures, bear in mind that there is no way to effectively vacuum mix a stone that sets this fast. (Ask me how I know!) As a result, the cast will be ready sooner, but will also have significantly more porosity. Is the time savings worth it? In some cases, ABSOLUTLEY.

One final approach for shortening the cast fabrication time is a little more radical. Using chairside CAD/CAM systems, like CEREC, clinicians are able to skip the cast fabrication step entirely. By digitally scanning the position of the implant and the patient’s other teeth, this case could have been completed without ever creating a physical model.
Ultimately, dentists may choose to delegate implant working cast fabrication to their dental laboratory technician, an in-office auxiliary or even a machine. Yet, understanding a variety of approaches to creating these casts will, hopefully, encourage clinicians to be creative in their problem solving and troubleshooting with patient cases.
Options are always good!
(Click this link for more clinical articles by Dr. Darin Dichter.)
Darin Dichter, DMD, Spear Faculty and Contributing Author