Quick Tips for Predictable Provisional Delivery and Retention
By Jeff Lineberry on December 18, 2015 | commentsYou finally got the tooth prepped, impression completed, and your provisional made. Here are some quick and easy tips to keep that great looking provisional in place and make delivery of your final restoration easier and more efficient.
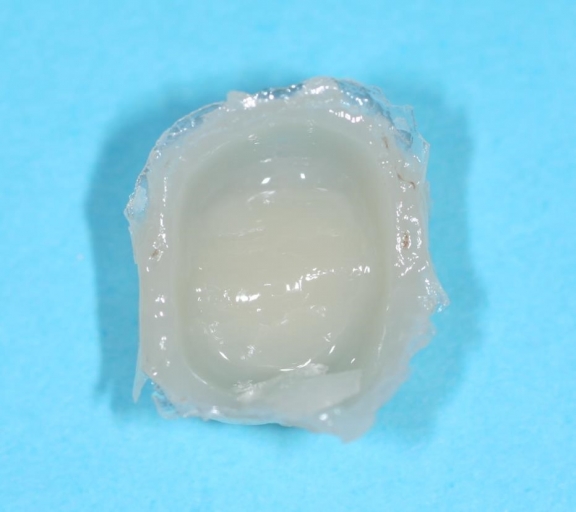
First and foremost, after the provisional has been made and grossly trimmed, you want to make sure that your provisional fits snug on your preparation and doesn’t wobble or is loose on the preparation. If it is, then you need to consider re-lining the provisional or re-making it so that it fits well on the prepared tooth/teeth. If we wait until we have the provisional through this first step, and if there is an air inhibited layer present, then any additional flowable repair/resin material with adhere readily to it.

If it is not fitting snug or doesn’t have a good retention, you may want to consider the preparation. If it is too short or the overall retention and resistance form is poor, then the type of cement you choose to use to retain your temporary will be more important than a tooth that has adequate retention and resistance form (i.e. stronger cement for shorter preps/less retention and weaker cements for teeth that have a lot of retention).
Now that your provisional is fitting well, you can use an alcohol wipe to remove the air inhibited/ sticky/shiny layer inside and out.
You can often use an E-cutter with a finer blade to properly trim the remaining bulk of acrylic, and then check it on the prepared tooth for proper fit of the margins as well as occlusal and proximal contacts. Before checking the occlusion, you need to floss the proximal contacts. Poor margins, rough or heavy proximal contacts that are not polished and just heavy enough to hold floss, or gingival margins that are not closed can lead to floss catching and your patient dislodging your provisional.

Next we check the occlusion in maximum intercuspation as well as all excursive movements. Often times I have found that heavy occlusal contacts lead to the provisional coming off or breaking rather rapidly after delivery, no matter how good it fits or what type of cement you use.
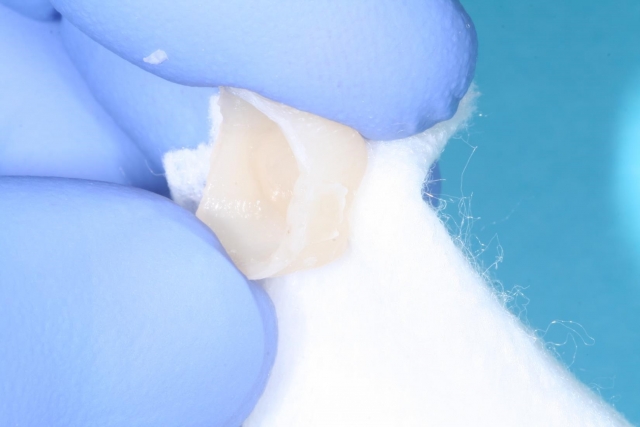
At this point, we can use a silicone point and discs to do any finer details or finishing to remove any rough/irregular areas before polishing. You can then polish the provisional to a nice shine. Using polishing felt/cloth wheels from Brassler can get you a nice and quick shine – all chairside and without a pumice wheel. A nice polished and shiny provisional serves many purposes, even in the posterior areas.
But what does this have to do with cementation and keeping it in place?
- The cement rarely will adhere to a polished surface, making cement removal easier.
- Food and the “stickier” foods that patients are supposed to avoid are less likely to adhere to the provisional, reducing dislodgement
- The tissue usually comes back happier for final cementation; this is a real plus.
Before cementation, re-wipe with an alcohol wipe inside and out and then microetch/air abrade the inner aspect of the provisional thoroughly until it is a matte, frosted appearance. Sometimes you have to microetch, wipe and microetch again, and you may even have to use hand instruments to scrape out any remaining residue. Otherwise, the shiny layer inside affords less mechanical retention from the cement that we select.

The other nice thing about doing it this way is that, if done properly and using a ZOE cement like Fynal by Caulk, the provisional comes off with all of the cement stuck on the inside of it versus on the tooth, making cleanup a snap!
After polishing, we are ready to cement. Even with a nice shiny surface, a quick easy trick is to put a light layer of Vaseline on the outside of the provisional just before seating the restoration. The cement doesn’t have a chance to stick to the provisional at this stage, making cleanup easy and less likely to dislodge the temporary while you’re trying to get that last piece off.
Once you have selected your cement of choice, and have isolated the tooth, place a lining around the peripheral only of the internal surface of the provisional, not on the inner occlusal surface. This will lead to a fully seated provisional without a lot of cleanup. If you fill it up or make/use a thick cement, this can lead to the provisional not seating all the way or, even worse, cracking it while expressing the excessive cement out. You can then do a quick check of the margins and proximal and occlusal contacts.
If we did everything correctly, the provisional should be fully seated and sealed, the occlusion should be correct, and all of the cement should be readily removed prior to dismissing the patient.
Jeff Lineberry, DDS, FAGD, FICOI. Visiting Faculty and Contributing Author, Spear Education www.cccdds.com