Three Tips for Managing Implant Placement and Tissue Healing
By John Carson on March 1, 2016 | 1 comment One of the most important aspects of achieving esthetic implants, especially in the anterior, is maintaining and developing ideal soft tissue contours to “frame” the implant restoration.
My preferred method for achieving optimal esthetics with implants involves immediate placement and provisionalization. The better you manage the placement and provisonalization of your patients implants, the more predictable the end result.
The following are three tips for managing placement and soft tissue healing with implants.
1. Plan Early: When possible, planning for the implant should start well ahead of total failure of the tooth. Waiting often results in loss of tissue support and increases the chance of infection that damages both the hard and soft tissue and at minimum increases the difficulty of the case. Even worse than this, it waiting will often decrease the overall predictability of achieving optimal esthetic results.
2. Place Implants Immediately: Placing implants at the time of extraction, when appropriate, leads to the best esthetic results and also decreases the overall treatment time from extraction to final restoration.
3. Soft Tissue Management During Healing: Assuming you can keep them out of function, immediate implants with immediate screw retained provisionals provide the best soft tissue management in the esthetic zone.
In my experience the best way to fabricate the provisional is with temporary abutment to which you fix the tooth. For the tooth, you can either use the patient's own natural crown, their old crown, a denture tooth, or a custom resin crown as I did in the case pictured.
The tooth is simply hollowed out and then bonded to the temporary abutment with resin. Once you have tacked it into place you can then remove it and finish it to achieve ideal contours outside the mouth. An important tip here is whenever possible, the implant should be positioned to allow for access to the retaining screw through the lingual as this will greatly simplify the closure of access esthetically.
The photos included were taken at 24 hours (left) and one-week post op (right) and demonstrate the healing and esthetics you can achieve with immediate placement and provisionalization.

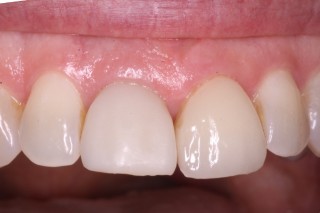
Custom shading with porcelain stains mixed in unfilled resin would have provided both a better shade match and sheen; however, the patient was thrilled with the results.
John R. Carson, DDS, PC, Spear Visiting Faculty. www.johnrcarsondds.com
Comments
June 15th, 2012