Fabricating a Crown to an Existing Removable Partial Denture
I was recently conversing with a lab technician who predominantly fabricates removable partial dentures when she shared a concern with me.
Many of her dentist clients struggle with how to fabricate a crown for a tooth that is an abutment for an existing removable partial denture, especially because the removable partial dentures are rarely submitted with the case. She conveyed the questions she is often asked on how to approach this problem and even some of the unreasonable requests she faces. After my discussion with her, I thought this topic was worth visiting.
Here were some of her chief concerns:
- Often an impression of the prepared tooth without any indication of how the RPD seats on the abutment is sent to the lab, so it’s a total guess job where the clasp and rests should go. (I’m not making this up.)
- There is often insufficient tooth reduction and consequently insufficient restorative space for the final materials and the RPD clasping.
- Lastly, and most frustrating, the rpd is requested back the same day. Really! (Of course, with CEREC technology in your office, this problem won’t exist, because you can scan the tooth before prepping and mill the crown right to it.)
I discussed this very topic two years ago with the suggestion that two impressions be made — one of the prep and a second of the prep with the RPD in place.
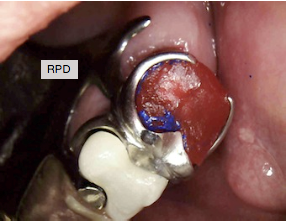
A GC Pattern or duralay pattern resin is fabricated over the prep with the RPD seated into it and it forms a coping that the lab can use as an index recording of where the rest seat and clasps should be. (See Figure 1.)
I came upon another technique that I want to share with you that my lab (The Winter Lab) recommends. Dr. Allen Weiner from Medford, Massachusetts, contributed the technique originally.
I like this technique a lot and feel it is the best of all the ones I have tried.
1. Prepare the tooth
Prepare the tooth and make an impression with your desired impression material. Make sure you have plenty of prep clearance around the clasps and rest seat. Then seat the RPD and express some bite registration material (medium to light body is probably easier than something hard and rigid for trimming purposes). Be sure to cover the clasps and rest seats.
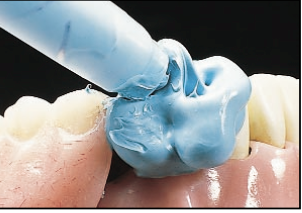
2. Trim material
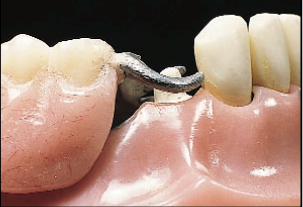
Once set, remove the RPD and the registration and start trimming back the material until you expose the outer surfaces of the clasps and rests and any material that will prevent you from releasing the RPD.
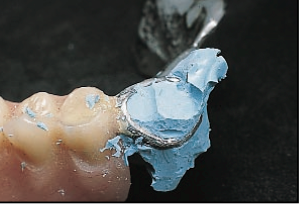
3. Remove index
Push the index out of the partial by gently pushing on it apically. You will be able to see some of the preparation of your tooth in this registration, and you want this so that the lab can index it on the die (from the first impression you made). Be sure to put it in a box when sending it to your lab to protect it during shipping.
4. Fit registration on die
Once at the lab, the bite registration will be fitted on the die and pattern resin will be flowed into the grooves of the clasps and rests. It also will need to extend down onto the model where the minor connector portion of the RPD would be.
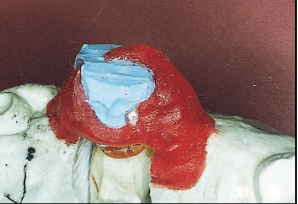
5. Construct contours
Once this has set, cut away the registration material and utilize the resin clasp assembly to construct the contours of the crown.
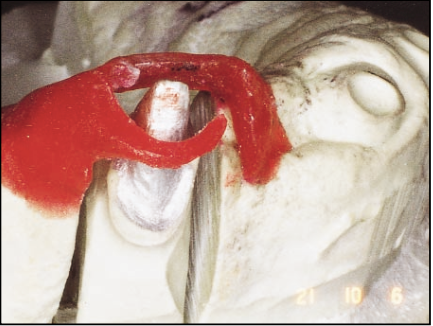
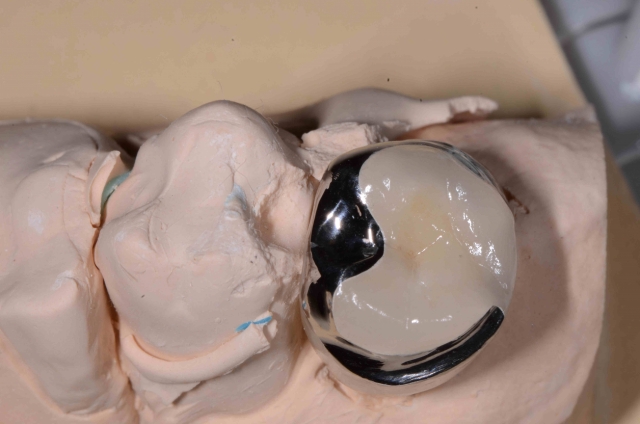
This works really nicely and is the most predictable way I have found to retrofit a crown to an existing RPD without taking the RPD from the patient.
Have a conversation with your technician to establish if this would be an ideal way for you to approach this clinical problem.
Although it is an additional step for you and the lab, this clinical scenario is easily constructed with a high level of certainty and success.
SPEAR STUDY CLUB
Join a Club and Unite with
Like-Minded Peers
In virtual meetings or in-person, Study Club encourages collaboration on exclusive, real-world cases supported by curriculum from the industry leader in dental CE. Find the club closest to you today!

By: Mary Anne Salcetti
Date: December 16, 2015
Featured Digest articles
Insights and advice from Spear Faculty and industry experts

