Simple Implant Surgical Guides and Implant Mapping
Implant surgical guides are necessary tools for communicating the desired implant position to the implant surgeon. The goal of the implant guide is to properly place the implant platform in the position that best allows for an ideal emergence profile and long-term peri-implant hard and soft tissue support.
Many different types of guides may be fabricated and utilized. In today’s implant world, many guides are three-dimensional, CAD/CAM guides designed from cone beam radiologic imaging. These guides are fabricated with specific guide holes that direct the position and depth of the implant drill for a very calculated implant placement.
Although these guides are very precise, to within hundredths of millimeters, there are some limitations. These guides do not allow for intra-surgical visualization of the apical gingival contour of the proposed restoration.
“Collaborative communication is key to successful implant placement and restorative outcome.”
— Share this on your socials
In reality, these guides create a “blind” placement of implants. Fabrication of a simple surgical guide that allows for intra-operative visualization of the proposed tooth outline and implant angulation can be a practical addition to a successful outcome. It also provides effective communication between the implant surgeon and the restorative dentist.
Good templates should have the following features:
- They need to be easy to place and remove.
- They should be rigid and stabilized on hard surrounding teeth.
- They must not interfere with tissue reflection.
- They must allow for proper cooling of the surgical drills.
- Most importantly, they must allow for visualization of the depth and position of the implant.
Additionally, the guide must be used for diagnostic radiology by casting a shadow on the X-ray film of the guide’s relationship with the underlying bone. The key feature of the surgical guide is the designation of the implant’s apico-coronal, mesio-distal, and oro-facial positioning. Much information is transferred from these surgical guides to the implant surgeon.
The guide’s most critical component is indicating the accurate gingival contour of the proposed final restoration. The surgeon uses this contour to visualize and measure implant-placement depth. The contouring is accomplished by fabricating a diagnostic wax-up.
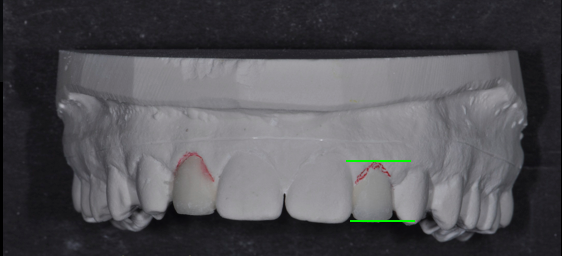
The completed diagnostic wax-up must precisely outline the final gingival margin position, the position of the incisal edge and facial contour, and the embrasure form of the proposed restoration. The accuracy of these dimensions is essential for providing predictability to the outcome.
Without the “vision” of the final restoration, it becomes challenging for the surgeon to correctly position the implant. Collaborative communication is key to successful implant placement and restorative outcome.
Once the diagnostic wax-up is designed, a duplicate model is fabricated. The simple surgical guide may be fabricated using a “suck down” technique using rigid, clear acrylic. The acrylic must be rigid enough to remain accurate for measurement during surgery and cold serializable. An ideal thickness to provide this accuracy is 1.5 mm. I commonly utilize 1.5 mm biocryl with a Ministar vacuum machine from Great Lakes Orthodontics.
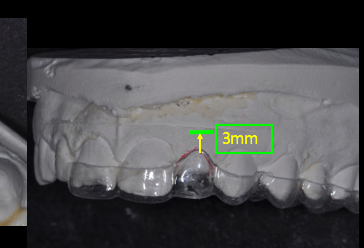
Once fabricated, the acrylic guide may be trimmed with acrylic burs and discs to the desired gingival outline and contour.
Because the guide is clear, the surgeon may easily visualize the twist drill through it to accommodate positioning. And because the guide is supported by the surrounding teeth, there is no interference with surgical flap design or reflection.
Implant depth is crucial for adequate “running room” and emergence profile. Ideally, the implant should be placed 3 mm apical to the gingival extent of the proposed restoration. Placing implants too shallow creates emergence contour limitations that create unesthetic gingival scallops. If the implant is placed too deeply, the tissue support and papilla formation may be compromised.
Tarnow has shown that if the distance of the implant platform and gingival tissue is greater than 5.0 mm, the interproximal papilla will be created less than 50% of the time. These surgical guides provide an unobtrusive visualization of the restoration margin and the implant platform at the time of placement.
The surgeon can easily alternate between the cone beam scan guide and the “analog” tooth visualization guide. Each guide provides the necessary information to place implants for restoration predictability and longevity ideally. Cone beam scan guides are “state of the art” for surgeons in today’s world for the accuracy of implant placement. “Simple” surgical guides, fabricated from the diagnostic wax-up and the expertise of the restorative dentist, provide the precision and detail required for a successful “crown down” implant restoration.
Implant Mapping
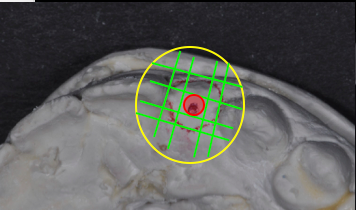
Implant mapping is a concept that creates ideal separation between dental implants and teeth. In today’s digital world, “mapping” is performed by computer programs, such as “Simplant” or “Anamage.”
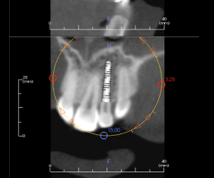
Through these software programs, implant placement is directed and planned based on the detailed information provided by the cone beam X-ray. The implants may be “digitally” placed with high accuracy. Surgeons are very reliant on these software tools.
From our discussion above, the restorative dentist needs to understand and apply the mapping concepts in fabricating surgical guides and mapping the implant on the model, which aids the restorative dentist in creating an accurate “pilot hole” in the surgical guide provided to the surgeon.
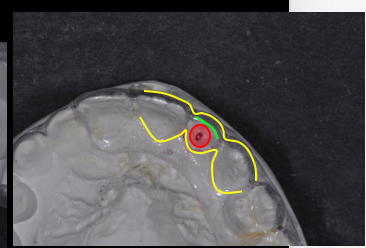
Implant position is critical, depending upon whether the implant restoration will be cement or screw retained. The restorative dentist must determine this retention information and forward it to the implant surgeon prior to placement. Mapping is the key to analyzing the implant position precisely.
An important dimension is the distance between an implant platform and an adjacent tooth. If the platform is placed too close to the tooth, the blood supply to the bone and root may be compromised.
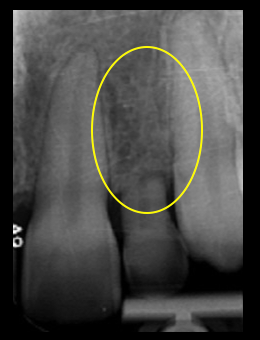
Additionally, the gingival tissue contours may be altered. Bone loss and altered papillae are likely sequelae. The common implant/tooth distance should be no less than 1.5 mm.
The distance between two dental implants is crucial to establishing a healthy biological dimension. If there is less than 3.0 mm between two implants, the interproximal bone will flatten, and papilla formation is not likely to occur. Normal bone healing and remodeling create a detrimental “crossover” effect with implants too close to one another, and progressive bone loss may occur.
Facial/lingual implant positioning is just as critical. Placing an implant less than 3.0 mm from the facial tissue will likely result in gingival recession and facial bone loss. An implant placed too palatal will create an emergence profile “overhang” and result in dental hygiene limitations and difficulty. Mapping the implant placement on a stone cast will provide a “visual reference” of predictability for both the restorative dentist and the surgeon.
The following is the mapping technique for a partially edentulous presentation:
- Obtain diagnostic casts of the edentulous space.
- Measure (with mm calipers) 1.5 mm from each cervical aspect of the adjacent teeth and mark the cast. (Overall space available must be 6.5 mm minimum.)
- Mark the center of the ridge between the adjacent teeth on the cast.
- Duplicate the model.
- Create a diagnostic wax-up for the edentulous space.
- Fabricate a clear acrylic implant placement guide from the wax-up model.
- Place a guide on the mapped model and drill a hole through the guide into the stone at the center mark (a 2.0 mm diameter hole is ideal for the surgeon’s initial twist drill).
- Provide the surgeon with the implant guide prior to implant placement appointment.
Implant mapping and simple implant surgical guides are tools for interdisciplinary communication. Although technology advances implant placement knowledge and ability, understanding and applying “analog” concepts and procedures are crucial for verification and assurance.
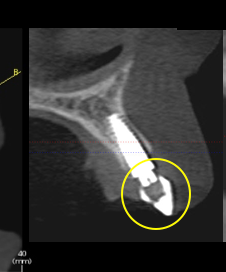
In interdisciplinary treatment, the expertise and knowledge of both the surgeon and the restorative dentist are paramount for a successful result. Communication is key. These tools help open the door for predictability and success in implant treatment.
SPEAR STUDY CLUB
Join a Club and Unite with
Like-Minded Peers
In virtual meetings or in-person, Study Club encourages collaboration on exclusive, real-world cases supported by curriculum from the industry leader in dental CE. Find the club closest to you today!

By: Jeffrey Bonk
Date: January 25, 2017
Featured Digest articles
Insights and advice from Spear Faculty and industry experts
