Want Better Dental Restorations? Put Down Your Handpiece
By Dave St. Ledger on November 19, 2016 |In our esteemed profession, there is continuing education, and then there is continuing education. There are hands-on workshops, and then there are hands-on workshops.
We all have tried a bunch of them from all over the map. It is quite possible the phrase “dental pearl” was created to hedge on a day of continuing education to make it feel worthwhile. Meaning, “The day was OK; not great, but at least I came away with a pearl or two.”
Pearl: (noun); a precious thing; the finest example of something
Dental Pearl: (noun); something clever I learned at a CE course or in an article that I think I can take back to my practice and implement (without too much trouble, of course)
So when you find CE – a workshop for example – that is so profound, so game changing, so practice- and profession-altering, you want to tell everyone. The Restorative Design workshop is just that. It is not “CE.” It is transformational; it is deliberate; it is exhausting, and yet exhilarating. If you allow it and are not stubborn, this course can help you create the standard you have been looking for in tooth preparation … the standard you never knew you were looking for. It offers clarity for designing restorations with these newer, beautiful and durable materials, and reinforcement for the classic restorations of decades past.
The Restorative Design Workshop enables participants to create preparation guides and mock-ups for the anterior segment, deliver a road map of thoughtfulness to visualize the outcome through the planning phase, and realize a level of conservatism in tooth preparation by embracing these preparation standards married to these newer restorative materials.
Outcome-based preparations
The biggest prize in the workshop lies in the standardization of preparations. Believe it or not, we can get lost in our preparations, and it does not matter how much experience you have. The concept of this workshop was born from this realization. Before the Restorative Design workshop was a glimmer in Dr. Robert Winter’s eye, there were two live-patient workshops. It was here the resident faculty realized, despite the high level of competency of the participants, that there were so many approaches and differences in the preparation of teeth.

Restorative Design was created to provide dentists with a very definitive path for tooth preparation as well as a thought process for design before preparation, ensuring more predictable and repeatable outcomes … not to mention intraoral scanning. Whichever one you prefer or aspire to acquire, CAD/CAM technology is here to stay. Recognition software is always improving, but it is still at the mercy of the crispness of the subject. This workshop was also designed specifically for where we are going in the future. Click this link for more on outcome-based preparation design.


Watching the restorative design maestro
Dr. Robert Winter is just that. About the most engaging part of the workshop is watching Bob prepare teeth on the typodonts live on the impressive audio/video set up throughout the laboratory. It truly makes you appreciate his intention as he approaches each preparation and what he is thinking. It also confirms the importance of magnification and the beauty of concentric cutting as well as constant torque of an electric handpiece. Visualization is key for me to learn and really get it. To watch “The Maestro” prep teeth, keep the handpiece on the tooth, and create a smooth finish line and axial wall was something I could not visualize before this workshop. I still was using air-driven handpieces, and we all know they do not cut the same. Notwithstanding my previous handpiece choice, Bob’s work taught me the importance of smooth axial walls and rounded internal line angles as well as how they increase predictablility of material survival.
Rest up
Come in to the Restorative Design workshop rested and satisfied by a good breakfast, because Gary DeWood and Bob Winter are gonna work ya! In all, you will have prepared 28 teeth in three days. They cover all styles of preparation using an electric handpiece:
- Traditional crown
- Flat-top crown
- Crownlay
- Onlay
- Inlay
- Veneers – minimal, conventional, extensive preps
As you go through the process, you will notice your own improvement from your first prep to your last. Embrace and trust the process.
Oh, those burs!

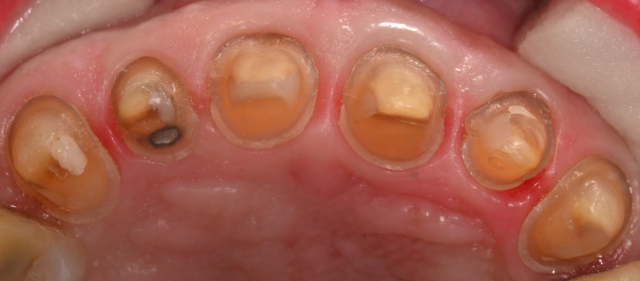
In planning for a standard of preparation, Bob Winter created the RD bur block from Brasseler. Far and away, they feel like the most efficient burs you have ever used. Handpiece type aside, the burs cut so seamlessly and better than so many I have tried before. The business end of them allow for a definitive depth cut, all the way to the finishing burs that help smooth any sharp edges on the finish line. Depth cutting, circumferential cutting and finishing immediately feel different but right. And it is all about conservativism. Learning the behavior of the materials with a certain prep style lends itself to creativity and allows less tooth structure cut. But you must learn it for success. The chances for success may be lessened by using the zirconia or lithium disilicate with the usual way you prepare a tooth. Just using these newer materials in your practice does not necessarily suggest you are embarking on a new age of dentistry. In fact, it may become frustrating unless the preparation matches the material’s intentions.
Once you become more proficient with prep design, the RD burs, specifically the RW2.0 and RW2.5 (now WDL 2.0 and 2.5) can help you achieve beautifully finished shoulders in the tightest spots on second molar preparations. And these burs were only meant for occlusal/incisal depth cutting!

- RW 2.0 – Occlusal depth cut
- 845 KR 025 – Cusp tip and occlusal reduction
- 856 018 – Circumferential reduction with two-phase reduction on functional cusp
- 8856 018 – The fine grit version for prep refinement and smoothness at slower speed
This simple set up is indicated for:
- Crowns with ceramic margins, posterior
- Crowns with ceramic margins, anterior (change RW 2.0 to 2.5 version)
- Onlay with or sometimes without “shoed” cusps, molars with existing MOD restorations

- RW 2.5 – Incisal depth cut
- RW Conv – Depth cut for facials/labials of conventional preparation reductions
- 856 016 – For labial reduction and a palatal incisal chamfer when indicated; the same tip thickness as the 018 but narrower as going up the shank
- 8856 016 – The fine grit version for prep refinement
This simple set up is indicated for:
- Conventional veneers
- Veneerlays – With a substitution of the two depth cutting burs, you can marry a veneer prep and an onlay prep together on a premolar (especially with existing MOD restorations), for example, and preserve structures, rather than “just crowning the tooth.”
As often the case, preparation design is dependent on existing structures and shade change.
Quick aside: The Restorative Design workshop saved one of my patients from functional crown lengthening on her mandibular second molars. She had significant wear occlusally, and it seemed crown lengthening would be a must. She was adamant and refused. Working with the Winter Lab, we created a wax up of a number of teeth, prepped the teeth with the RD burs, sent a preliminary impression to the lab for their blessings and/or constructive insights, kept her in the temps for a while, then impressed and finished the crowns. It has been more than three years and so far so good. It was entire process of the RD Workshop – the visualization of the design, the retentive preparation, the smoothness of the surface, the electric handpiece, and the increased magnification – that allowed this to happen.
Cracks
There is also a segment on cracks. The sign of cracks may be under-evaluated in dentistry and often left untreated unless a symptom is associated with it. They are some of the biggest clues on teeth and can speak to occlusal disease and/or inappropriate tooth contacts. Click this link to read more about the silent epidemic of cracked teeth.


Five years ago, I took the workshop. At the start of the workshop, they asked each participant to write down anonymously the dimensions they use in their mind for crown and veneer preparation. The results were shared anonymously and were vastly different, proving they may not be a standard. They also proved that, after preparing a handful of teeth, dentists, by and large, underprepare teeth without that intention. We think we have reduced enough, but this was proven not to be the case.
And over the past seven years, I have spoken to so many dentists, from the newbies to the experienced. One common thread in these discussions was their willingness to admit that they fool around with their preps too much, or they can get lost in the preparation. This was important as this, from time to time, was my own feeling. Outcomes would turn out well, but the amount of energy spent was taxing. We all strive for proficiency, if not perfection, while often being too critical of our own work. When you have a standard, you have clarity and will be less critical.
The Restorative Design workshop taught me to think, but most importantly, it taught me to put down my handpiece.
(Click this link for more dentistry articles by Dr. David St. Ledger.)
David St. Ledger, D.D.S., Visiting Faculty, Spear Moderator, Contributing Author