Considerations for Preparation Design and Facial Margin Placement: Part VII
By Frank Spear on August 8, 2016 |(Click the links for earlier articles in this series: Part I, Part II, Part III, Part IV, Part V, and Part VI.)
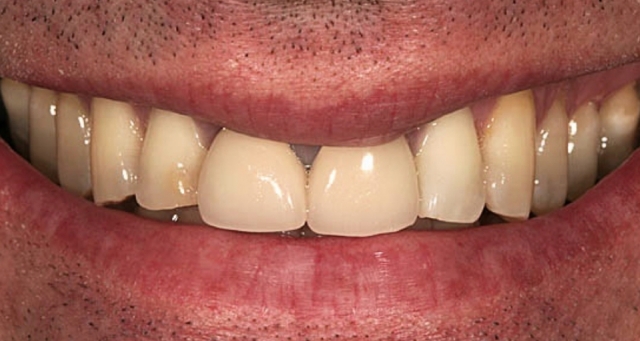
This patient has several different problems, each of which will need to be addressed in the design of his restorations.
For the purposes of this article, I will leave out discussing tooth wear, as it is a much longer discussion than is the intent of this piece. That leaves us with minor recession on the laterals and canines, gingival level problems on the centrals, a severely discolored left central, and the need to restore all six anterior teeth.
Starting with the recession, it is very slight on the laterals and right canine, but the base of the CEJ is visible on all three teeth. On the left canine there is perhaps 2 mm of recession. No cervical lesions or notching are present. He does have models more than 10 years old that show the same position of the gingiva, so it doesn’t appear to be progressing.
Since the laterals and canines have good tooth color and will be restored with veneers, it will be possible to use supragingival margins just coronal to the CEJs. This means the cervical margins can be bonded to enamel, and there won’t be any need to retract the tissue. If the gingiva ever did recede more, it also leaves natural root exposed to graft over rather than ceramic.
The centrals have entirely different problems. They need the gingiva apically positioned with osseous surgery and, due to the discoloration of the left central, it will have to have a subgingival margin placed. When I am treating both centrals, if one needs a subgingival margin due to discoloration, I will place a subgingival margin on the other as well in order to make them more uniform in appearance. (Figure 2)

In addition, if both centrals are crowns, as they are here, even though only one is dark, I will tend to prep the other central the same as the dark one. Whatever material I choose to mask the dark central will be used on the one with normal color to give a more uniform appearance to both centrals.
In this case, I chose to correct the tissue levels on the centrals first. A gingivectomy was done to position the gingiva to a more pleasing position, followed by removing the crowns, prepping to the new gingival levels, and placing temporaries. (Figure 3) The margins are now too close to bone, but they can be used as a good reference when a flap is raised. The facial bone is removed until it is 3 mm from the prepped margins, and the flap is replaced with no apical positioning.

The advantage to this approach for esthetic facial surgery is that there is no root exposure following the surgery, as the teeth were already prepped and temped to the correct gingival level. Twelve weeks later the final preps were done. (Figure 4)

As discussed in previous parts of this series, the key for the dark central is facial reduction of 1.2-1.4 mm for adequate room to cover the discoloration, and subgingival margin placement of .5-.7 mm. (Figure 5)


My preferences for material selection for masking the dark central would be an opaque coping with stacked ceramic over it, or lithium disilicate pressed over it. The coping could be made from several materials, in this case opaque zirconia. For the veneers, if you had used pressed lithium disilicate on the centrals, I would use lithium disilicate for the veneers. In this case, since stacked ceramic was applied over the zirconia copings, stacked ceramic was used for the veneers. (Figures 6 and 7)
(Click this link to read more dentistry articles by Dr. Frank Spear.)