The Double-Cord Impression Technique
One of the most common things I hear from other practicing dentists is the frustration of getting that “perfect impression.” This is something that I struggled with early on in my career. Without a great impression, doing crown and bridge work can be frustrating for both the dentist and dental lab technician.
I have tried many different techniques over the years but have found one that seems to get great results consistently for the dentist and the dental lab.
Tissue management is key to having a great impression. Early on in my career, I tried to take impressions in the presence of inflammation and/or in tissue that was less than ideal. At times, I even tried to avoid crown lengthening with the thought of trying to save the patient money but this often led to disappointing results and the need to go back again.
Less than ideal impressions
If the tissue is less than ideal, try to get it to a better place with good home care and good re-care visits; sometimes even using adjunctive therapy, such as chlorohexidine rinses prior to preparation, can help the tissue. If your preparation is deep and needs crown lengthening, get it done or do it yourself if you are properly trained to do so. You are not doing your patient or yourself a favor by trying to get an impression in areas that are too deep. Even if you do get the impression in this circumstance, the chances of failure are high since the patient cannot clean it properly and the tissue is more likely to be less than healthy.
Once the tooth or teeth are prepared, you are ready to start the process of taking your impression. To start, I use a product like ViscoStat or Astringedent to stop any immediate bleeding after preparation. I thoroughly rinse the area to make sure there is no residue left behind since some of these hemostatic agents can impact the setting of the impression material. Afterwards, I place cotton rolls or a combination of cotton rolls and dry angles to keep my area clean and dry – which is a must.
I place two different cord sizes; usually a #00 and #1 cord, in a hemostatic agent with aluminum chloride in it and allow them to soak. There are cords already impregnated with this agent along with others, such as Epinephrine; these can help manage bleeding or sulcular seepage and should only be used in healthy patients and/or ones that can tolerate the agent. The cord size is determined by the depth of the sulcus and amount of retraction needed. Sometimes I will use smaller cord for a very shallow sulcus and a larger one for a deeper sulcus.
I place the #00 cord into the sulcus first and verify that there is no overlap on this first cord. This cord will be left in place at the time of the impression, which reduces the chances of having any loose ends sticking to the margins during the impression.
Once the first cord is in place, I will place the larger cord on top of it. Then I let this to sit for three to five minutes to displace the tissue properly and allow the hemostatic agent to work.
Make sure the retraction cord is wet
Now that you are ready to take your impression make sure you have all of your impression material readily available. An important step to take before I remove the top cord is to make sure that the cord is wet. This step is essential because the cord can dry out too much which can cause it to stick to the surrounding gingival tissue; when you pull it out dry, it will tear the epithelium layer off, leading to new bleeding and a new problem before you take your impression.
Once I wet the top cord again, I will remove it carefully and dry the preparation thoroughly. If I can see the margins clearly, then getting a great impression is straightforward. If this isn’t the case, then I reposition the first cord or use some hemostatic agent to get things ready for the impression if needed. I place fresh cotton rolls and/or dry angles to keep the area clear and dry from saliva.
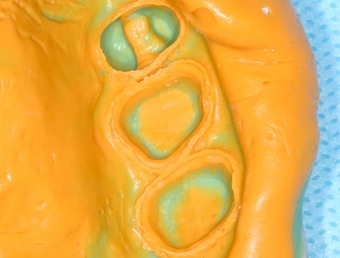
I then take a light body impression material, such as, Aquasil, and inject it directly into the area where the cord was removed, making sure to avoid air bubbles by keeping the material flowing and the tip in the impression material. This step is done while my assistant is loading the impression tray. If I note any seepage from the sulcus or minor bleeding during this injection phase, I will use a light stream of air to blow the impression material down into the sulcus area and displace any material that is heavily contaminated. As soon as I do this, I quickly re-inject back around my preparations, seat the tray and allow it to set per the manufacturer’s recommendations. Almost every time, I will get an impression similar to the image above, making it easier for my lab to fabricate an excellent fitting, beautiful and long lasting restoration.
Remember, if you do not manage the tissue properly, you will fail at obtaining an impression with the details your lab needs to meet or exceed your expectations no matter which technique you use.
SPEAR campus
Hands-On Learning in Spear Workshops
With enhanced safety and sterilization measures in place, the Spear Campus is now reopened for hands-on clinical CE workshops. As you consider a trip to Scottsdale, please visit our campus page for more details, including information on instructors, CE curricula and dates that will work for your schedule.

By: Jeff Lineberry
Date: December 15, 2016
Featured Digest articles
Insights and advice from Spear Faculty and industry experts


