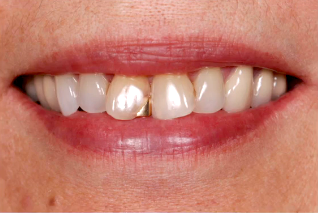

As the closing article in Nancy Case Study (Part I) series, I'll be discussing Nancy's final restorations. I ended up going with a set of crowns made from Feldspathic porcelain (Part II). Obviously, how you place your crowns is very dependent on what material the crowns are made of. Since this Feldspathic set was baked on a refractory dye, it has to be bonded to achieve adequate strength.
When bonding all-ceramic crowns, onlays, or veneers, you start thinking about resin cements and dentin adhesives. In this scenario you'll have the choice of utilizing a self-etch adhesive or a total-etch dentin adhesive. You also have to take into consideration if you're going to use a light cure or dual cure cement and a light cure or dual cure adhesive. To answer these questions you need to know the opacity of the final restoration.
With Nancy, we're using 1mm thick Feldspathic crowns and since there is no opaque built into the crowns, there shouldn't be any issues with light transmitting through to cure our cement or adhesive. This allows me the option of using a light-cured dentine adhesive, and a light cured cement. Using this system offers some advantages, such as long term color stability of the cement and extended working times; but also poses some disadvantages, most notably, curing through any ceramic material, even translucent Feldspathic, risks a lack of light penetration to both adhesive and cement. To prevent that from happening I will do a 30-second cure from facial and lingual with a high-powered light to make sure I get adequate curing.
Any time I bond, I always pumice or air-abrade the preps until all residue from the temporaries is gone. I also evaluated Nancy's case relative to her gingival health, and checked the margin depth to determine if cord was necessary for isolation. Although she had superb gingival health to begin with, the margins were subgingival about .5mm and I didn't want to risk any fluid contamination for the bonding, so I packed 00 cord around each tooth. I waited until after I had packed the cord to perform the air abrasion, assuring I would have a clean prep to bond to.
I etched with a 35 percent phosphoric acid for 15 seconds, and then rinsed thoroughly for 10 seconds. I then used an ADEC air dryer to dry lightly and without contamination, being sure not to overdry and dessicate the etched surface. Even though Nancy's teeth weren't sensitive, I did apply some "Gluma desensitizer" on the preps for 20 seconds to aid in disinfection. I then placed two layers of 3M Single Bond Plus on the preps and made sure to dry the area vigorously to evaporate all of the solvent, but did not cure the adhesive.
In Nancy's case, the crowns were re-fired and needed to be re-etched with hydrofluoric acid, cleaned in an ultrasonic, and then have silane placed prior to being ready to bond. Just prior to bonding two layers of "3M Single Bond plus" was applied to the crowns internally and dried, but not cured. Finally, the crowns were seated with translucent 3M RelyX veneer cement and light cured.