Eight Steps to Facially Generated Treatment Planning [Part II]
By Frank Spear on December 7, 2012 |As I discussed in Part I of this article, planning treatment for wear patients can be difficult because of all the different possibilities that can occur as teeth wear. The following are steps five through eight:
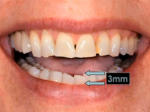 Step 5: Mandibular incisor incisal edges. Especially in wear patients, you want to evaluate the lower anterior teeth and how they relate to the face. Also, you want to evaluate the position of the lower anteriors to the face in a smile. It is fairly common for mandibular anteriors to erupt as the maxillary teeth wear, or as the mandibular teeth wear, if this occus you may need to reposition the lower anteriors to create the necessary space to restore the maxillary anteriors. In this case the amount of mandibular anterior display seems acceptable.
 Step 6: Mandibular incisor inclination. The next three steps, which include this one, are typically done on mounted models. Since we now know what the desired maxillary tooth position is, it is possible to determine what needs to be changed to the mandibular tooth position to correct the occlusion, including any specifics that reflect the etiology of the wear. In her case we see that the lower centrals are slightly proclined so retracting them would gain some overjet.
 Step 7: Mandibular occlusal plane. Since she has no wear on her posterior teeth, this evaluation lets us see if the mandibular anteriors have erupted as the maxillary teeth have worn. There is definitely a slight step in her occlusal plane, so some lower eruption is possible. Certainly leveling her lower occlusal plane would gain some space to restore the maxillary anteriors.
 Step 8: Evaluate mandibular anterior gingival levels. This, as in the maxillary arch, is where we see the amount of mandibular eruption. If the mandibular anteriors have minimal wear, evaluating the occlusal plane will help you see the eruption, but if they have significant wear, they may have erupted and still have a level occlusal plane. By identifying your desired mandibular incisal edge position and now looking at where the gingiva needs to be positioned to correct the tooth length, you can get a much better feel for any change in mandibular anterior position.
These are the eight steps (steps 1 - 4) I go through on every single patient when I begin treatment planning. What the photos can't show you is the three-dimensional relationships of the arches you get from mounted models. In this patient, once the models were mounted by making a bite record with the condyles in a seated position, the models showed she had plenty of over jet available; we just couldn't see it in her habitual occlusion.
Ultimately I equilibrated her bite so that her intercuspal position coincided with the seated condylar position and she now had adequate overjet for me to restore the six maxillary anterior teeth to our desired position.