Utilizing composite resin or ceramic veneers are two of the most sought-out dental treatments for patients seeking an esthetic upgrade in an everyday restorative practice. More often than not, patients come in asking for a smile design and the improvement of esthetics by means of ceramic veneers. In reality, the challenge when communicating with patients is unveiling the “why”? Why do patients think they would be a candidate for such restorative solutions?

So the way we typically communicate esthetic enhancements with patients is by singling out the reason behind their “esthetic unhappiness.” The areas we discuss are:

  • Color
  • Contour
  • Arrangement
  • Position

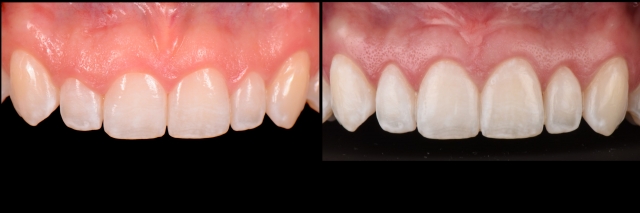
Through this visual essay, the reader will experience the patient's mindset shift, as the patient presented with a very specific request: “I don't like my teeth; I am here to get ceramic veneers.” We were able to meet the patient's esthetic demands without the use of any restorative materials.

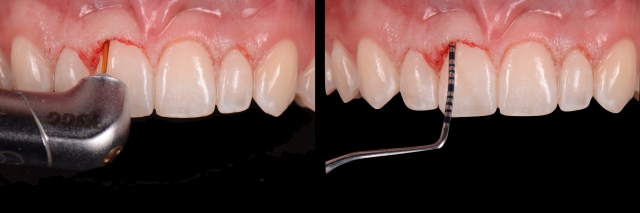
All it took was a modification of both shade and contour. Contour modification was accomplished by doing gingival crown lengthening utilizing a Waterlase iPlus unit, (while at it, a frenectomy was also performed), followed by optimizing tooth shade by means of tooth whitening. Utilizing the previously described “buyer's journey,” the patient realized we could meet her expectations through a more conservative approach.

Figure 1: Facial pictures, depicting tooth display in repose and full smile.
Figure 2: Close-up picture of patient's smile; note the size and shape of the anterior teeth.
Figure 3: Intraoral view of patient's teeth in occlusion
Figure 4: Anterior sextant with black contraster; note the size and shape of the anterior teeth.
Figure 5: Periapical radiographs reviewed to rule out dental disease.
Figure 6: Wax-up of the esthetic prototype.
Figure 7: Smile and intraoral view of the esthetic prototype that will be used as the guide for the crown lengthening procedure.
Figure 8: Pre-op view and esthetic prototype comparison; note the difference in length (gingival and incisal) of the four anterior teeth.
Figure 9: Utilizing Waterlase iPlus (Er,Cr:YSGG) and MT4 tip, the gingivectomy was performed, using the esthetic prototype as a guide.
Figure 10: View of the finalized gingivectomy of the four anterior teeth.
Figure 11: Utilizing Waterlase iPlus and MC6 tip, osseous recontouring and bone plasty were performed, the adequate reduction was double checked with a periodontal probe on every site.
Figure 12: Utilizing Waterlase iPlus (Er,Cr:YSGG) and MT4 tip, a frenectomy was performed.
Figure 13. Before and after frontal view immediately after the surgery.
Figure 14: Frontal view eight weeks after the surgery was performed.
Figure 15: In-office bleaching was performed, starting with an A1 VITA shade and finishing with a BL3 VITA shade.
Figure 16: Smile view of the finalized treatment
Figure 17: Intraoral view of the finalized treatment
Figure 18: Step-by-step sequence of the treatment (1) Initial view (2) 8 weeks after the surgery (3) 2 weeks after the whitening procedure.
Figure 19: Frontal view of before and after treatment; note the change in contour and shade.
Figure 20: Facial final smile view.

(Click this link for more dentistry articles by Dr. Ricardo Mitrani.)


Ricardo Mitrani, D.D.S., M.S.D., Spear Faculty and Contributing Author


Comments

Commenter's Profile Image Mojgan M.
February 18th, 2019
Very nice result. It is awesome that you were able to do the bone re-contouring with just laser and no flap. What types of laser can do the bone re-contouring?
Commenter's Profile Image Luis G.
April 2nd, 2019
Hola Dr. Mitrani, excelente caso, y ejecución impecable. Solo una pregunta, por qué motivo realizo la frenilectomia?