4 Steps to Simplifying TMD Diagnosis
By Kevin Kwiecien on March 22, 2016 | 5 comments“We are a sum total of a life-long progressive compensation and adaptation process.” Herb Blumenthal


Thank goodness human beings are so adaptive and compensatory in nature. And even better, thank goodness we are unaware of it most of the time and don’t even have to think about it … until we do, until we are made aware of it and are forced to think about it. But whatever sign or symptom has brought to our attention the good and bad of our adaptive abilities, it is important to remember that what we are experiencing at that time is just a snapshot of a long award-winning film that would be called “Your Life Until Now.”
Signs and symptoms that dentists routinely observe with teeth and gums (our comfort zone) serve as a glimpse into the past and, although we are quite comfortable working in that realm, we still often forget to look for the aforementioned film (i.e. how did our patients get there?) before beginning production on the sequel (i.e. what do we do now?). And even when we do, even with our education and experience, it can still be a little confusing to understand the plot and characters. Add that dilemma to the rarely-rented movie, “The Temporomandibular Joint,” a movie that infrequently comes up on the “suggested Dentflix list” for most of us, and we’re having issues – mostly because even if we watched it 10 times, we would still struggle to fully comprehend who is the good guy and who is the bad guy, let alone the crazy twists in the plot.
Many dentists, even after realizing that the TMJ is a pretty important component of the system that we treat, are very intimidated and hesitant to incorporate even a cursory evaluation of the joints into the exam. Why do you think that is? Would you be open to the possibility that many dentists don’t feel adequately educated about the TMJ to even do the exam? And even worse, what if a sign or symptom is actually found!? You might have to know what is causing it, let alone how to treat it.
(Click here to read "When Should I Worry About Jaw Click?")
Finally, what do most dentists usually want and acquire to better evaluate a tooth after the clinical exam, especially if there are any signs and symptoms? Yes, an image, usually a radiograph. What is the proper image for the TMJ? And how in the heck is it ordered? And how is it evaluated?
The anxiety-provoking news: The temporomandibular joint is the hinge and foundation of the system on which you work every day. It makes sense to understand it at a level that promotes confidently discussing it and competently examining it.
The good news: You don’t have to be an expert. Even better, you don’t even have to know the answers. In fact, most of the time, you won’t. But you can be an integral part of finding the answers and helping your patients make choices that guide them to health.
Step 1: Understand Anatomy and Function
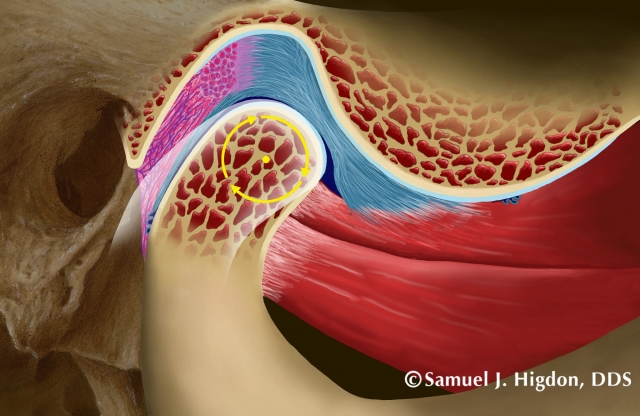
A picture is worth … well, ok, sometimes you need two pictures and maybe even an image to better understand the anatomy and how the joint works. The traditional drawings of the temporomandibular joint (Figure 1) do a fantastic job of identifying the components of the joint and demonstrating the simplicity of something that can seem so complicated.
Normal Anatomy
The head of the condyle and the glenoid fossa are the ball and socket.
The articular disc is a cartilaginous disc that is skinny in the middle – while fat in the front and in the back – that separates the ball and socket. Since it is 100-percent cartilage, it has no sensation due to the total lack of nerve or blood innervation. The skinny part is ideally where the forces from the joint are always placed. The disc is held in place (actually tethered!) by a ligament on both sides, the medial and lateral ligaments, and a band of the superior belly of the lateral ptergyoid muscle on the front. The inferior belly of the lateral pterygoid is connected to the head of the condyle. And finally, there is some tissue behind the joint that is highly innervated with nerves and blood vessels called the retrodiscal tissue. And really, that’s about it.


The only problem with such a great illustration is that it does not show the 3-dimensional properties of the joint (Figure 2), demonstrating that it has a lateral pole and medial pole and that the articular disc is actually quite huge, covering the entire top of the condylar head. And by the way, neither illustration shows that it is connected to another joint on the other side!
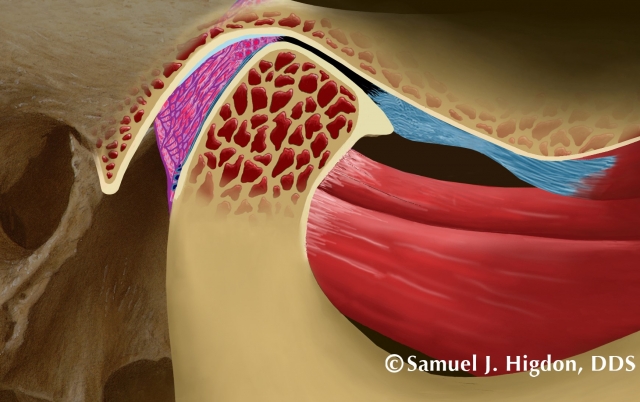
Once normal anatomy is understood with illustrations, a close evaluation of a radiographic image/scan (Figure 3) becomes much easier to understand and appreciate from multiple angles and planes. Even better, normal anatomy can then be appreciated via other platforms, whether it be dissections, stains, etc. (Figure 4).

Normal Function
Once the components of the normal TMJ are identified and it is understood how they are connected, normal function can be quite easily understood. As the ball comes out of the socket, guided by the lateral pterygoid muscle, the ligaments of the articular disc stretch to allow the skinny part of the disc to stay on top, creating a smooth pathway down the articular eminence of the glenoid fossa (Figure 5 - 7). Again, once normal function can be understood conceptually with the help of the illustrations, normal imaging can be more easily understood (Figure 8).


Step 2: Visualize What You THINK Is Going On
Yes, it is a guess. But it can be a very-educated-best-guess after an efficient and intentional joint exam:
- feeling for signs of inflammation
- listening for sounds
- watching the hinge move
If healthy cartilage sliding on another piece of healthy cartilage is around five times more slippery than ice (and it is), what might cause the TMJ (bone-on-cartilage) to move in an awkward manner or make sounds? And what might cause the muscles that move the joint to be tender, asymmetrical or shaky? Most of the time, it is related to the cartilage between the ball and socket.
Remember how lucky we are to be adaptive? Sometimes even good luck can run its course. As our bodies adapt without even asking us or giving us more obvious signals that it is being forced to adapt, things change. Understanding and visualizing some of the common causes and consequences of change can help us have a “very-educated-best-guess” as a great starting point for diagnosis and treatment.


Clinical History: Trauma
A history of trauma (often a fall as a child or small incident playing sports that goes almost unnoticed and is quickly forgotten) almost always results in the mandible being pushed to the left or to the right, similar to rolling an ankle while walking (that we also quickly forget after the pain diminishes). When the mandible is pushed to the right, the lateral ligament in the right joint is stretched, while the medial ligament in the left joint is stretched since they are connected by the mandible (Figures 9 and 10). The ligaments have very little elastic properties, so the articular disc loses some of the stability that was holding it in place. But remember, it is stretched on the lateral side of the right joint and the medial side of the left joint. And also remember that the force on the disc changes as the joint translates down the articular eminence moving from medial to lateral during translation (Figure 11), so it would make sense that the joint sounds on the right are different from the left, maybe a click upon early opening and late closing on the right, and a click only upon late opening on the left side. Two different sounds at two different times caused by one traumatic episode … that now makes sense.

Visualization of the Disc
The articular disc ideally starts its life looking very much like a red blood cell (Figure 12): skinny in the middle, fat on the front and back, and 3-dimensional. The effects of trauma on the joint and ensuing compensatory movements could create sounds and movements that, when correlated to what we see, hear and watch, make a lot of sense when we visualize the disc in function and shape.

Visualizing Joint Events: The “Click”
If either the medial ligament, lateral ligament or both have been stretched/sprained, they will always be more susceptible to another sprain. It could almost be referred to as a “sloppy joint.”


Regardless of what side is anteriorly displaced, or if it is the entire disc, conceptually understanding what it looks like and how it can find its way back on can be very helpful to understand a very common sound in the joint, a click, as the disc is temporarily captured back to a more ideal position (Figure 13). As opposed to being afraid of a joint sound/event, it is very helpful to appreciate that the sound is most often a good thing! Additionally, when appreciated on an image, it can also help us understand what we are looking at when evaluating images (Figure 14).
Visualizing Joint Events: Closed Lock
Suffice it to say that if the joint can find its way forward due to trauma or lose ligaments that sometimes it cannot find its way back. And if you use your imagination and a nice illustration (Figure 15), the feared closed lock is better understood. As opposed to a click often caused by part of the disc being recaptured, it sort of makes sense that a closed lock might be more of the disc forward, making it more difficult to find its way back. Or might be that the side of the joint that has more pressure (medial or lateral) being the same side that the disc is anteriorly displaced (medial or lateral).
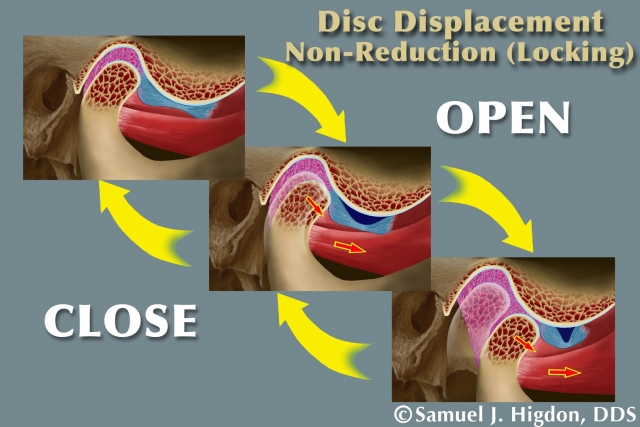
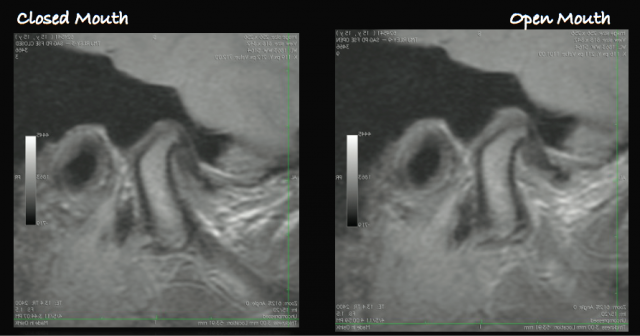
And again, when understood conceptually, evaluating images can quickly become clearer to us (Figure 16), and evaluating the image gives us a visualization of what might be happening in many, if not most, of our patients.
Visualizing Clinical History: Clenching
The joint space is being constantly replenished with synovial fluid, which brings nutrients and lubrication. Similar to a wet kitchen sponge that has been wrung out by constant squeezing pressure for an extended period of time, the disc can get dried out and stuck in the same position and shape. After a stressful day or long night of clenching, the joint space has been essentially drained of fluid and the disc does not move smoothly, thereby creating a temporary closed-lock sensation. You might even refer to it as a “sticky disc.”
Now imagine a disc routinely in a slight anterior position on the head of the condyle (Figure 17) due to a history that perpetuated a sloppy joint that historically is easily “recaptured” into a more ideal position when the mandible moves forward … until the clenching begins. And all of a sudden the painless routine click becomes a louder click or even a closed lock. Are you surprised? And can you visualize what might be happening? Is it still as scary?

Visualize Clinical History: Painful Muscles
 When the body accommodates, muscles brace. Period. And we don’t know that the compensation is happening … until we do.
- Question: What causes painful muscles?
- Answer: Accumulation of lactic acid
- Bigger Question: How do you stimulate blood flow to counteract the lactic acid?
- Answer: Stop contraction, increase blood flow, decrease inflammation/irritation caused by lactic acid
- Biggest Question: How do you do that?
- Answer: See Step 3 (below)
Step 3: Test It with Plastic
We don’t have to know the answers. Ever. We can always be looking with the patient and working with the patient to discover what is happening. Can we can stop what is happening? Whether we can or cannot stop it, can we at least help them feel better? Creating an environment that is completely reversible and removable that can be changed or altered in almost any way imaginable is a pretty great way to test our hypothesis. And then test another one. And then another, if needed. And so on.
(Click here to learn more about occlusal appliances for muscle and joint pain.)
There are too many types of occlusal orthotic appliances to review in this article. However, it is easy to remember the following:
- Only anterior teeth touching: Elevator muscles release, joints are loaded
- Only posterior teeth touching: Elevator muscles are activated, joints are supported
- All teeth touching with anterior guidance: Muscles release as back teeth disclude, joints are loaded more when back teeth disclude


We can make an anterior bite plane (Figure 18) or a posterior pivot (Figure 19). Or we can make a full-arch appliance (Figure 20), with which we can add or remove plastic depending on how the signs and symptoms change, thereby testing the hypothesis and making the next “very-educated-best-guess.”
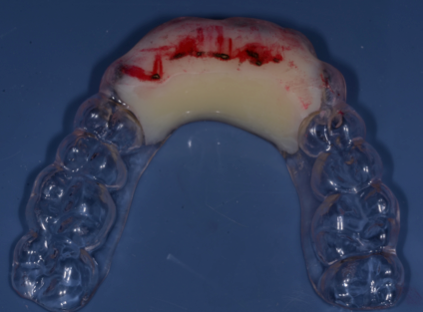
We can even use plastic to help diagnose what movements or habits, like clenching and/or grinding might be causing the signs and/or symptoms (Figure 21).

Appliance therapy is always diagnostic. We might be releasing muscles or stimulating muscles and we might be loading joints or supporting joints, all in an attempt to treat the patient, but we are always, by default, using the appliance to evaluate what happens when we do. The appliance might help clarify the signs and symptoms, yet it might sometimes create more confusion. And then, yes, we have a new “very-educated-best-guess.”
Step 4: What Else Do You Want to Know?
It is not uncommon for many practitioners to take an “image” of the joint when there is pain, clicking, popping, deviations, locking, etc. And then they don’t know what to do with it. They just do it because it sounds right or because that’s what other practitioners do. I’m going to challenge you. If you have followed Steps 1 – 3, ask yourself, “What else do I want to know? And what image do I want? A panorex? Medical-grace CT? MRI? CBCT?”
If we combine our history and exam with our understanding of the anatomy and function, maybe we want to confirm whether there is active breakdown or repair in the joint. And maybe we want to do it before using any plastic (appliance therapy). Evaluating the cortical bone or lack thereof in the head of The condyle can help determine the current condition (Figures 22 and 23), while adding to your current “very-educated-best-guess.”

A CBCT can help evaluate the following:
- Changing bone (before and after)
- Perforations in bone (active breakdown)
- Location of the loading zone (pressure on medial or lateral pole)
- Size of the condyle versus size of the fossa (pre-pubertal versus post pubertal damage)
- Healthy joint versus damaged
If we know what we are looking for and how that might look conceptually (Figures 24 and 25), we now have a reason to take the image and we take it with intention.


Similarly, when you do have a “very-educated-best-guess,” you might also want o use some other tools to either confirm or contribute to what else you want to know. Joint vibration analysis (Figure 26), joint tracker (Figure 27) and Doppler ultrasound (Figure 28) can all contribute to the evaluation.


What Else Do You Want to Know: Part 2
One might think that all of these diagnostic tools are used just for that: diagnosis. Remember that all of them can be equally, if not more useful when used to re-check and compare to previous images and readings. They are really only helpful, however, when you first ask yourself, after steps 1 – 3, “What else do I want to know?” You might also feel compelled to ask yourself the same question after Step 2 (before any appliance therapy), depending on your vision of what you think is going on. But now you have a reason for it and an understanding of the findings.
This is, in no way, intended to be a catch-all article on TMD. Evaluating the joint and understanding “TMD” can be intimidating … until it is not. But remember, the evaluation is only a snapshot of the movie called, “Your Life Until Now.” We need to understand how the patient got to this point in the movie by using the history to establish a best-guess. And we need to understand the anatomy and function to visualize what might be going on. And we need to come up with a “very-educated-best-guess” to determine what we want to test on plastic, maybe after or while simultaneously acquiring appropriate images or using other tools to help support or refute our working hypothesis, our “very-educated-best-guess,” so that we can help write the scrip for the rest of the movie with an ending that will leave the audience smiling.
Acknowledgments
Dr. Sam Higdon, Dr. Herb Blumenthal, Dr. John Droter, and Dr. Ed Zebovitz for brilliant images and never-ending wisdom.
(Click this link to read more articles by Dr. Kevin Kwiecien.)
Kevin Kwiecien, DMD, MS, Spear Faculty and Contributing Author
Comments
March 25th, 2016
June 20th, 2016
June 29th, 2016
November 11th, 2016
November 14th, 2016