
If you are like me, then implants are becoming a bigger and bigger part of your practice. As we know, managing soft tissue around our implant restorations can be challenging. One of the best ways we can achieve optimal results is through influencing the soft tissue contours as soon as possible which in many cases means the use of immediate provisionals as described in this article about soft tissue healing around dental implants. But what do we do when we need to modify these provisionals?
For example, let’s say you did an immediate implant provisional and while you like the soft tissue esthetics you have achieved with your implant provisional, you want to refine the occlusion or the esthetics and contours of the rest of the provisional. So what’s the best way to do that?
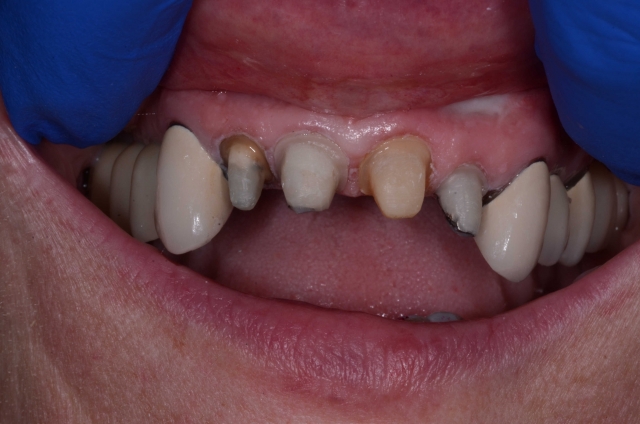
You could take the whole thing out, modify it and put it back in but is this really efficient when dealing with screw retained implant provisionals? And what about cases involving multiple units? And to further complicate things what about cases like the one show in Figure 1, which involved implants in the position of #8 and #10 with screw retained provisionals as well as crowns having been planned on #7 and #9. While taking the screw retained provisionals apart is certainly one option in a case like this, it can add a lot of chair time and can also make managing the mix of provisional types (natural teeth and screw retained implant provisionals) somewhat complicated. So the question is how do you make things as simple as possible while still achieving an optimal result?
The most efficient way I have found to handle cases like this is to do a diagnostic wax-up as normal, which for me means following the EFSB principles as taught in Facial Generated Treatment Planning. Once this is done you can then fabricate your provisional matrices off the wax-up. Once this is done rather than removing the implant provisionals, simply prepare the screw retained implant provisional(s) like teeth. Then once all the implants and teeth are prepared as pictured in Figure 2,all that’s left is to fabricate your provisionals as you normally would.
One key to remember is: once you have everything prepped and you are ready to fabricate your provisionals, make sure to confirm you have the access hole of the implant screw protected and sealed (I like to use teflon tape for this) prior to fabricating your new provisonal(s). This assures you won’t get any material into the screw access hole which could lead to getting material in and around the screw and screw head.
John R. Carson, DDS, PC, Spear Visiting Faculty and Contributing Author www.johncarsondds.com