Sometimes, we think of our temporaries or provisionals as just that – temporary. Poorly-fitted temporaries can lead to issues including food impaction, tissue irritation and sensitivity. Ultimately, it can impact how the patient's overall experience is with the procedure and it could keep the patient from pursuing future restorative procedures that could inflict similar problems. In addition, it can make delivering your final restorations more difficult and can even make the overall health of the tooth questionable if there is thermal sensitivity and/or pain present.
My goal when seating a temporary is to have margins that are closed, well-fitted to my preparation and smooth. This will not only keep the tissue healthy around the prepared tooth, but it reduces the likelihood of any sensitivity during the time the patient is wearing the provisional. Often times when we are making our provisionals, whether it is for a single unit or multiple units, we will remove them from the mouth and either notice that the margins do not fit well or they no longer have properly fitted margins after they have been trimmed. After trying different techniques over the years, this is the best way that I have found to get consistently good fitting temporaries/provisionals.
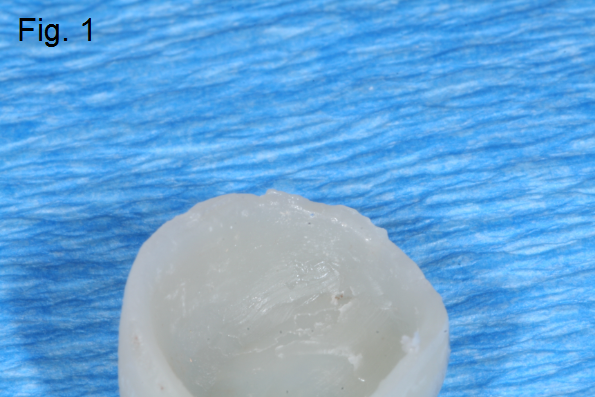
If I notice a margin has an air bubble after removing the temporary, or if the material didn't flow down into the area that it needed to, I simply retry it back onto the tooth and note the area that needs additional material. (Fig. 1)
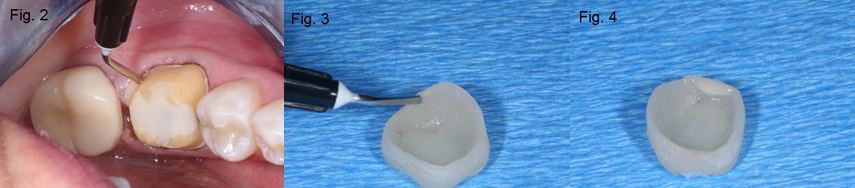
 Then I add flowable resin material (light cured) to the temporary and to the area of need on the tooth. (Fig. 2-4)
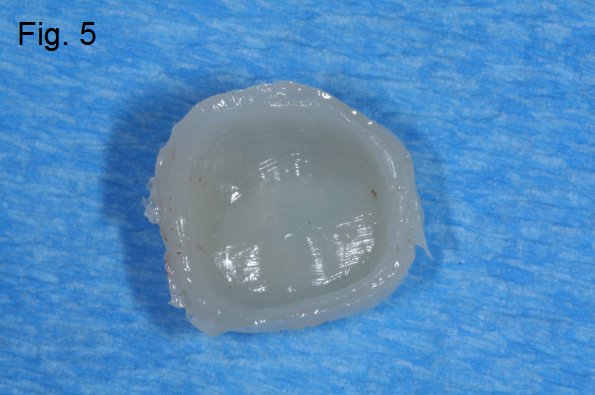
 I carefully place the temporary back in place and light cure the area for five seconds. Be careful to note undercuts and rough areas that could allow the additional material to lock on the temporary/provisional. Next, I remove the temporary and finish curing the repaired area. You should be able to clearly see your margins and polish them accordingly. (Fig. 5)
 If you have already removed the air-inhibited layer via polishing or wiping the area with alcohol, you can add some bonding agent and evaporate the excess. (Fig. 6)
 Be careful to make sure that none of it gets on the inside of the temporary. Cure the bonding agent and repeat the steps above using light cured resin.
By using this technique over the years, I have been able to get consistently great fitting provisionals/temporaries and capture the entire margins appropriately.
Jeff Lineberry, DDS, FAGD, FICOI Visiting Faculty and Contributing Author, Spear Education [www.jefflineberrydds.com]
My goal when seating a temporary is to have margins that are closed, well-fitted to my preparation and smooth. This will not only keep the tissue healthy around the prepared tooth, but it reduces the likelihood of any sensitivity during the time the patient is wearing the provisional. Often times when we are making our provisionals, whether it is for a single unit or multiple units, we will remove them from the mouth and either notice that the margins do not fit well or they no longer have properly fitted margins after they have been trimmed. After trying different techniques over the years, this is the best way that I have found to get consistently good fitting temporaries/provisionals.
If I notice a margin has an air bubble after removing the temporary, or if the material didn't flow down into the area that it needed to, I simply retry it back onto the tooth and note the area that needs additional material. (Fig. 1)
Then I add flowable resin material (light cured) to the temporary and to the area of need on the tooth. (Fig. 2-4)I carefully place the temporary back in place and light cure the area for five seconds. Be careful to note undercuts and rough areas that could allow the additional material to lock on the temporary/provisional. Next, I remove the temporary and finish curing the repaired area. You should be able to clearly see your margins and polish them accordingly. (Fig. 5)If you have already removed the air-inhibited layer via polishing or wiping the area with alcohol, you can add some bonding agent and evaporate the excess. (Fig. 6)Be careful to make sure that none of it gets on the inside of the temporary. Cure the bonding agent and repeat the steps above using light cured resin.By using this technique over the years, I have been able to get consistently great fitting provisionals/temporaries and capture the entire margins appropriately.
Jeff Lineberry, DDS, FAGD, FICOI Visiting Faculty and Contributing Author, Spear Education [www.jefflineberrydds.com]